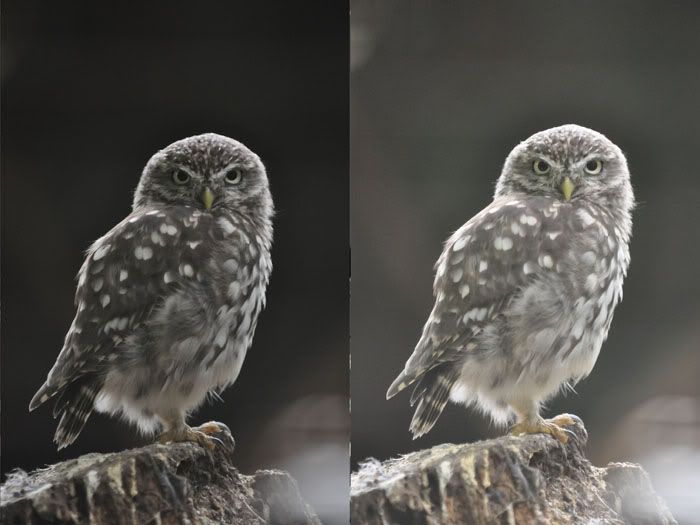
Many people complain about their images having '' too much noise '' when in fact the problem is often related to bad exposure techniques . Have a look at the two images below , the one on the left is how the image looked to my eyes while the one on the right looks a bit brighter than the scene appeared to my eyes .
But if you look at the histograms the one on the left is actually underexposed though , strangely , the one on the right looks like it has more noise .
This is because the background should look almost black but "over-exposing" the background by "exposing to the right " has made it look gray and "noisy" .
This is not really a problem because we have a lot of information to work with and it's easier to make the gray area black than it is to make a black area gray .
To add to the explanation , these pictures were taken at up to iso 3200 so we should expect to see the worst noise possible from the D90 .
The picture on the left is what looked right to me after dialing in -1.3 compensation .
The picture on the right is how matrix metering determined the exposure to be correct and it was actually right .
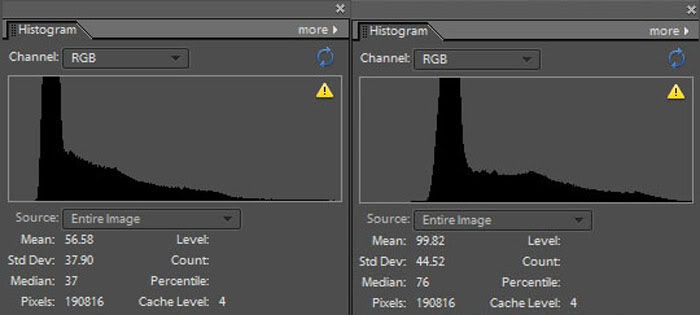
 The histogram for the right image is touching the right hand side as it should be .
You can see the one on the left has a lot less information - even though the picture looks 'correct' .
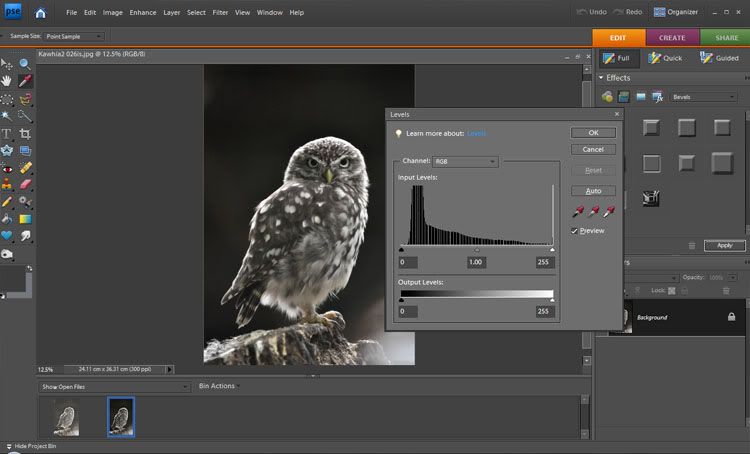
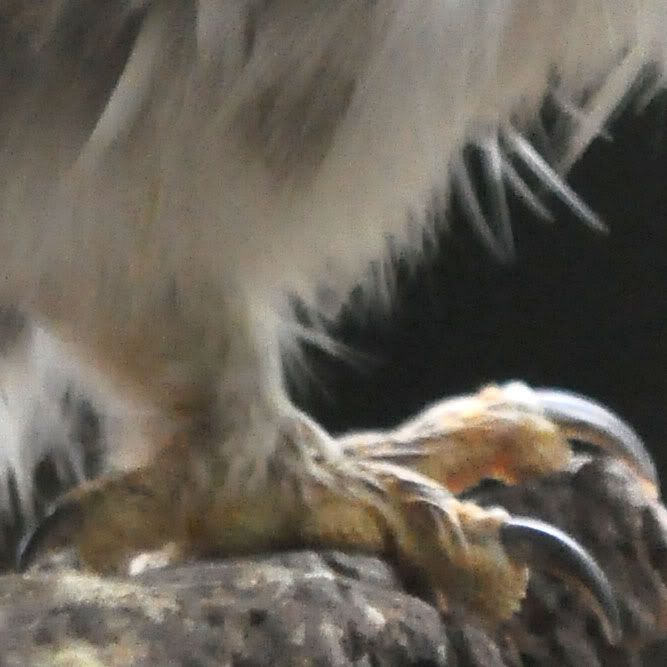
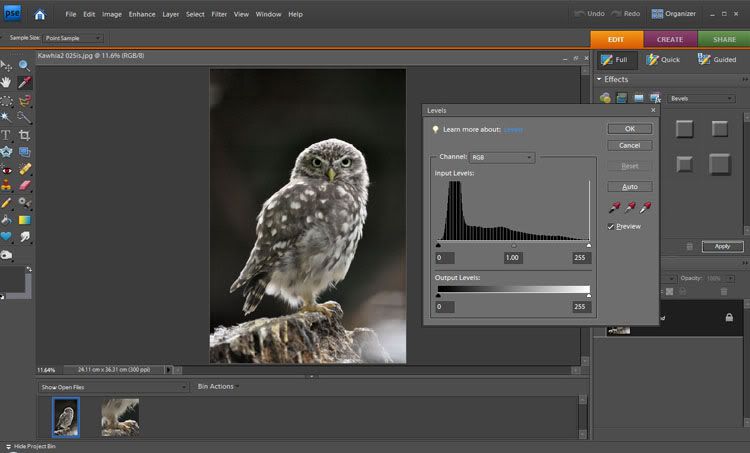
Now we open the images in photoshop and adjust the levels . For the first image I had to drag the right slider to the left to brighten the image - the resulting noise can be seen in the crop below . This is what happens when you under-expose an image and try to fix it when there is not enough information captured in the first place .
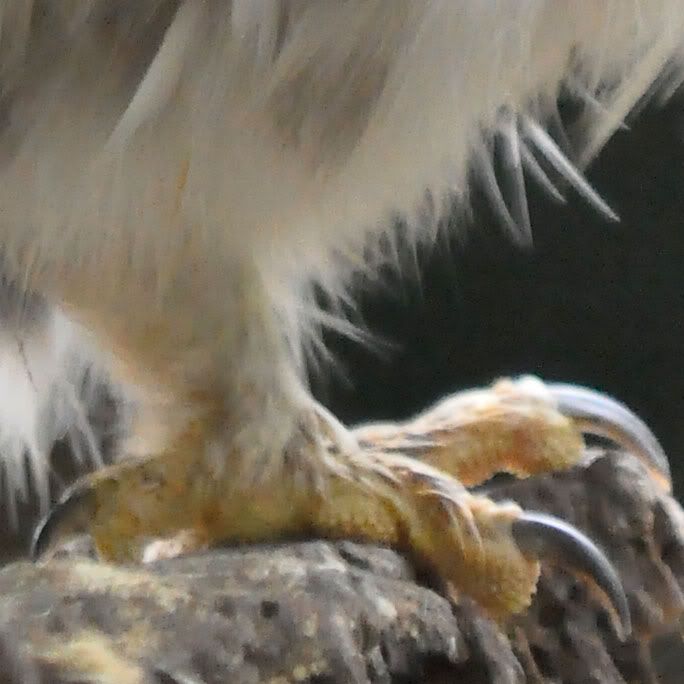
 Now we take the second image - it is already bright enough where it needs to be , it is just the dark areas that need to be made darker . With a difference of 1.3 stops we have more than twice the information , in the form of light gathered , available for editing .
What is important is that we don't need to amplify the light areas , we just want to suppress the information in the dark areas and make it look black - this results in noise getting wiped away rather than being created by the program trying to make something of nothing .
When we look at the resulting crop , even though it is not pretty [ well it is iso 3200 ! ] , it looks a lot better and has much better colours than the first image .
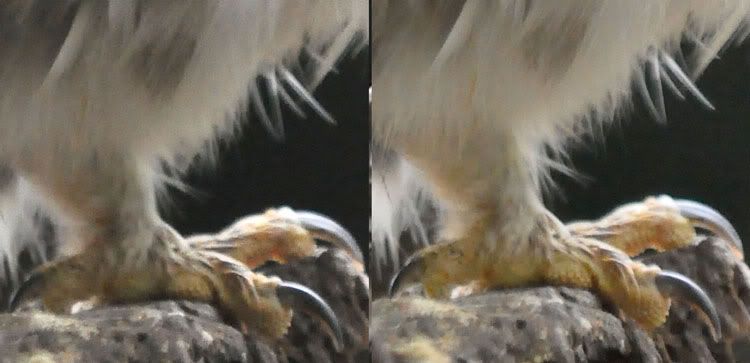
Here are the two crops side by side . Remembering that they are both at high iso from a Nikon D90 and the final images look very similar ...... one person could tell you the D90 does a pretty good iso 3200 while another could tell you it does an awful high iso image. {You know what is really interesting? The image with the most noise is actually at iso1800 - lower than the better looking image at iso3200!}
It all depends how well they are exposing the image in the first place - as with cars "Most problems are caused by the ' nut ' that holds the steering wheel "
In the same way I could actually generate a lot of noise at iso 200 by under-exposing an image and then brightening it later in photoshop .
It all depends how well they are exposing the image in the first place - as with cars "Most problems are caused by the ' nut ' that holds the steering wheel "
In the same way I could actually generate a lot of noise at iso 200 by under-exposing an image and then brightening it later in photoshop .
Just as a re-cap , the images I ended up with looked the same after editing - from a distance . The one on the left though was "nice from far but far from nice " while the one on the right was much better when viewed up close . Here they are together after editing :
They don't look 100% the same but could with some fine tweaking ........

Look at the colour of their eyes , beak and feet again . Depending on personal preferences I could make the one on the right look exactly like the one on the left with more editing and it would have less noise because I started with more than double the information . I could also make the one on the left look like the one on the right but the noise would get worse and the colours would still be ugly !
Don't let the lcd display on the back of the camera be your guide - watch the histogram .
1.) Making the shadows as dark as you want to see them and disregarding the histogram is a recipe for disaster because that will mean you have to brighten the light areas later - you will have to amplify the available information because you never captured enough of it in the first place .
{ cranking up the radio when you have a weak signal results in 'hissing' /noise}.
2.) Exposing for the bright areas however , means that you have all the information that you need and you can actually throw away information in the areas you want dark - essentially killing the noise by turning it all into one large black area without having to sacrifice any of the information in the light areas !
1.) You can't recover information you haven't captured in the first place .
2.) If you capture the right amount of information you can throw some away where you don't want it without any adverse effects to the light areas .
Update : What not to do !
Exposing to the right does not mean pushing the histogram off the right hand side . Rather it means adjusting exposure to get the brighter parts of your image correctly exposed without having to increase brightness later -
Remember too that if you overdo it you can't recover totally blown highlight detail . I recently took some pictures of cloud formations and overdid the added exposure a bit much . This was the 'good' shot . note the histogram bumping up against the side with only a little blown highlights but good detail in the rest of the shot . Realistically this shot was already correctly exposed with only a slight amount of detail lost in the cloud .

This is the overdone shot - two stops more than the previous image - better colours but blown highlights - beyond recovery .... you can tell from the spike on the right hand side of the histogram .
Don't push the histogram off the right hand side unless it is maybe something like the sun which is impossible to include with detail or a very bright part of the scene that is not part of the subject and perhaps it can't be properly exposed without badly under-exposing the rest of the image .


And on the second one I did the same thing .... the colours are richer but the details are blown - something in-between the two would have been good .

And side by side ..... you can see the potential for better colours with the brighter exposure but if you overdo it you lose detail in the highlights .

So remember to watch your histograms and ''expose to the right '' when possible but don't overdo it either !
-->


Enjoyed the article, but I don't understand allowing the histogram to be cut off at the right. I was under the impression that any highlights that extend beyond the right side of the graph would be blown out (lost) highlights.
ReplyDeleteThat's right , you don't want to cut the histogram off at the right . The last part of the article was discussing not overdoing it and the example was showing that having the histogram spiking at the right loses precious details .
ReplyDeletethis is really interesting. I was wondering though, when does 'exposing to the right' become a real consideration? That is, in what situations might you find yourself that you would need to consciously try to expose to the right? And, conversely, when would you not really need to give it much consideration?
ReplyDeleteThanks for the article.
I'm finding it difficult to think up a situation where you wouldn't want to expose to the right but I would say you would give it the most consideration in a high contrast scene where bright areas , not important to the final image , would influence your metering to slight under-exposure of the important areas .
ReplyDeleteDesmond, this is a particularly interesting post. That is, to expose to the right and then pull the levels in from the left in order to avoid the noise that would be obtained from going the other way. Great tip.
ReplyDeleteI wonder how someone would approach the situation when black or a dark color dominates the scene, as the histogram would naturally clump to the left. I see by your side-to-side histograms that you should increase your exposure if you see the histogram trail off to steeply on the right. I am wondering how far you can push it in those situations where dark predominates.
As with my post on dance photography I've noticed that Nikon's matrix metering tends to automatically expose to the right , but when there is a lot of black in the setting it overdoes it to the point where I have to dial in "-2" ev compensation for a dark stage setting .
ReplyDeleteMy "rule of thumb" , perhaps until I learn better , is to expose to the right as much as possible [ unless the item is totally gray or darker] without blowing any "important" highlights - you can always blow the highlights later in photoshop if you want but you can never recover blown highlights .
It's easy enough to kill the shadows as much as you want in photoshop :)
I'll add that if there is a lot of dark in the scene , as with a dance , if it is supposed to be black then let it be black but concentrate rather on the histogram for your subject - my D90 allows me to zoom in and check only the histogram on the subject - that's what is important .
ReplyDeleteIf the subject is small and the rest of the scene is black then the histogram is supposed to clump to the left ... the subject will then give a very weak trail of a histogram to the right - that is normal in this situation .
Thanks for the response....heard about the earthquake....hope you didn't sustain any injury or damage.
ReplyDeleteNope , I'm on the North island :) .
ReplyDeleteI may sustain some damage in the next few days though , I'm going to climb Ruapehu and there are severe gale force winds on the way .
If you check my ''photovan'' blog the previous stories are documented there and this week's story might be up in a few days :)