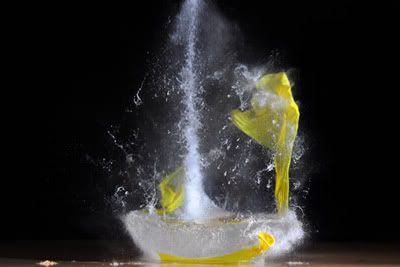
Just a demonstration of what a capacitor in a flash can do ....
Thursday, July 29, 2010
Tuesday, July 27, 2010
My Letter to George
Hi George , so someone advised you to spend over $3000 on a D700 and prime lenses , that you don't even need or know how to use , when you stated that your budget was $400 ..... "to save you money" ! ?
Perhaps that's why they say " How do you make a small fortune in photography ? ..... start with a large fortune !"
Did this guy have one eye bigger than the other , head tilted to the side , drool out one side of his mouth and a twitching eye-lid ? Perhaps a "Nikon rep" card on his jacket ? Just kidding , he probably meant well but he made some huge assumptions that you would
1.) stay with your hobby for a long time ,
2.) actually want to go full frame ,
3.) be prepared to sell one of your kidneys to finance the purchase or go into debt , and
4.) be willing to lug around a heavy camera with two lenses that he likes rather than perhaps what may be right for your needs .
[ To be honest I wouldn't swap my D90 and 18-200VR lens for a D700 with any prime lens - that's a personal preference though ]
My advice - for $400 you could get a good used Nikon D50 and 18-55mm lens plus perhaps a used SB24 flash that will give you good image quality and superior flash synch speeds to a D700 and the equivalent of 6X the flash power of a D700 in high-fp mode using what I call realsynch flash . Until you understand what the heck I am talking about it is pointless for you to get a D700 unless by some unlikely chance you will start making money from low-light photography in a few weeks.
The D50 is 6 megapixels which is more than enough for most of us -[ they printed a 3 storey high image from 12 meg ], has decent high iso performance and the 18-55 lens will provide you with a reasonable wide angle for landscapes along with a usable 55 mm at the long end .
Think about it , if you buy that D700 brand new it will be worth less than half what you paid for it after three years . The used D50 will still get you at least half what you paid for it in that time and you will only have lost $200 for its use compared to $3200 plus the interest you would have to pay on the loan along with insurance costs of the D700 kit [ perhaps $3500 total ?] .
Invest in last year's technology , don't waste money on today's latest gadgets unless you are making a living from your hobby . When these companies bring out a new sensor it goes into their latest pro camera . After they resolve the initial teething problems with the camera they release a semi pro model with an improved sensor . Then they bring out the advanced-amateur version with further refinements . lastly they bring out a beginners camera with a perfected sensor while they release a sensor with more [unnecessary] megapixels in their latest pro body .... and repeat the process .
You end up with a camera like the D40 with a 6 meg sensor and image quality that puts the first professional 6 meg cameras to shame ..... while everyone clambers for the latest 10 meg sensor with all it's new teething problems - and someone wants you to buy a D700 as a beginner ?
The sad fact is that there are still professional photographers out there that seem to believe the latest gear takes better pictures while the reality is that you can do a lot with an entry level camera and nobody will know what camera the image was taken with anyway .
So my advice is to get the used D50 kit , learn to use it and as you advance you will know where you want to go from there - whether you need to spend more money on newer gear or still need to learn the basics .
Maybe next year you can buy a good used D90 from someone who upgrades because their D90 "doesn't take good pictures" , if your finances allow for it . If the D50 is still serving you well invest in lenses rather than another body , they maintain their value .
Take advantage of the people that seem to think they need a D700 to start with and then sell it cheap later because they either aren't interested in the hobby any more or realize how hard it is to make money from photography .
Buy the old technology cheap and cut your losses .Who knows , maybe in 5 years time if you are still keen on it the D700 will cost you $400 :) .
Saturday, July 17, 2010

Tuesday, July 13, 2010
Glowing filament
Tonight I wired a soldering iron in series with the flash capacitor and light bulb .
Now I have a more subtle glow that I can control easier when I do my next set of 'breaking light bulbs' shots .

If I work at iso 200 and F16 this is the glow I will get .

17 July 2010 .
I bought some cheap light bulbs but unfortunately they only had frosted bulbs . I managed one ok shot with the one clear bulb I had .

and a few of the frosted bulbs ....


Monday, July 12, 2010
The Flash-bulb
Previously when I was taking high speed images of breaking light bulbs a few people mentioned that they would look better with a glowing filament .
 Tonight I opened an older flash and un-soldered the wire from the capacitor to the flash tube and wired it in series with a 220 volt light bulb . The red wires and dotted red line show where it used to be connected .
When I have the old flash on low output the flash fires weakly but there is no response from the filament .
When I switch it over to high power I get a reaction - but a little too much . I need to get the right amount of power to have the filament glowing without blowing out the exposure .

More 'experiments ' to follow :)
15 minutes later and I had opened another older flash with thyristor control - in the hopes that I could get the flash to turn off sooner for a dimmer glow . Not to be !
I faced the sensor toward a white surface to help it detect the flash and hopefully turn off quickly . It still gave out too much power .
At first I was confused as to why the optic flash trigger would not fire this flash but then I remembered that when I checked its trigger voltage it was "-8 v" , the earth pin was in the centre which was not normal - the electronics of the optic trigger could not switch a 'backward voltage' .

13/07/2010
Tonight I ran the wiring through a soldering iron as well to waste some of the energy . Now I have a controllable glow that will look right at iso200 and F16 .


This 'diagram' shows the path of the the current flowing through the circuit . The blue lines show where the wires were originally connected . The lower blue wire was cut and connected to the red clip going into the soldering iron . The current flows through the soldering iron and back down through the black clip which is connected to one of the terminals of the light bulb . The circuit is completed as it flows back from the other terminal and through the flash tube . Each item represents a volt drop of some sort and the coil of the soldering iron probably adds an inductance to slow things down a bit . The voltage drop across the light is just enough for a light glow and the rest of the energy is wasted in the soldering iron and across the flash tube .

17 July 2010 .
I bought some cheap light bulbs but unfortunately they only had frosted bulbs . I managed one ok shot with the one clear bulb I had .
and a few of the frosted bulbs ....
24 July 2010 .
I got hold of 10 clear light bulbs finally . I tried various 'devices' to destroy them and got some pretty decent results .


and a couple with the sword ....


And then I noticed my axe leaning up against the wall and decided to do a few with it .


Perhaps when I get exactly what I want I will spend some time processing the images to look better but I would really like to get it right in camera rather :)


Friday, July 9, 2010
Analyzing Canon ETTLii
These two images submitted on a NZ forum interest me [ ETTLii ]


That's a little crazy ! When you focused on the white object toward the front it exposed pretty well considering the subject was highly reflective .
But when you focused on the object behind it , a black object at a greater distance it under-exposed in comparison ?
The way I see it , one option is that for the background focus the camera did not register focus confirmation or it exposes any out of focus objects as average grey regardless of where they are and in this case the white object fooled the meter - strange ?
Update : I was just informed that the second shot was in fact manual focus and the camera did not confirm 'focus lock' which means we are back to square one - the point where we worked out that ETTLii drops the distance info and resorts to average gray metering when it doesn't confirm a focus lock- regardless of how far the subject is behind the white object .
Two more tests , this time auto-focus locked .... almost identical histograms due to the distance info being used .


I don't see any sense in Canon dropping the distance info when there is no focus-lock . I mean if a subject
is so badly out of focus why bother with changing the equation anyway ? If it is only out by a small percentage and could be a keeper when why not use the distance info anyway for a more accurate exposure ?
Tuesday, July 6, 2010
Canon vs Nikon flash studies .
As of 7 July 2010 I am inviting test shots from Canon users to try to 'reverse engineer ' Canon's flash system in a similar way to what I did with Nikon TTL-BL mode .
So far Stefan on photocamel has provided me with these images from the 7D and a 430 EX flash and the results are interesting .
Test 1.)


The histograms of both the 'near' focus and 'far' focus both went down instead of the 'far' focus increasing exposure as with TTL-BL mode . I was expecting the distance info from the lens to tell the flash system to increase output when the focus was changed to infinity but the opposite happened ?
Perhaps when the camera doesn't detect anything in focus it reverts to plain "average gray" metering for the flash ?
Now we are in the really early stages of doing these tests and nothing has been double checked by others yet so I still welcome input . I would like to go through all the tests as shown in my TTL-BL blog to see what we can work out and compare Canon and Nikon flash systems just for interest and for those who would like to learn the 'nuts and bolts' of the systems .
This is how Nikon's TTL-BL handled the situation .


When the flash system detected that focus distance was at its maximum it increased exposure without showing too much regard for the out of focus white in the foreground .
Compared to what Canon ETTLii does for the moment I see this as an advantage .
There are probably very few people who use manual focus indoors but for anyone who does manually select a focus distance the Canon flash system will instantly lose any advantage distance information from the lens would have given it if the camera doesn't agree that anything is in focus .
However with the run of problems with canon auto-focus who know what the camera may deem to be 'in-focus' ;) .
So the question now is " Does Canon ETTLii totally drop the distance information when it doesn't detect 'focus confirmation ?"
Anyone interested in doing the tests , this is the scenario we need :
Test 2.)

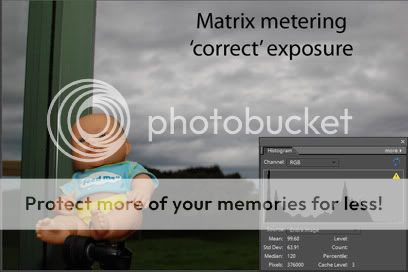
Please excuse the creepy looking baby but "Stinky" was my model back then .
Have a white object close to the camera and covering half the frame . Place the subject next to the reflector , take a picture , and then quite a distance behind it and take some pictures .
Nikon's TTL-BL ignored the white object and concentrated on what was in focus at the right distance .
Then set focus on infinity and take another picture .
This will tell us if ETTLii uses the lens distance info when the subject is in focus and whether it totally drops it if it does not confirm focus on a distance object .
I'll list the tests I would like samples of for those interested in participating , we'll call this test number 3.)
A comparison between TTL and ETTLii with a black and white subject and varying degrees of 'centrality' of the subject .... like this ....


The point of this test is to show how TTL meters differently to ETTLii . Normal TTL meters off a central circle while ETTLii should meter almost equally for the white subject as long as part of it is under the focus points . if the white leaves the focus point 'diamond' then it will probably blow out .
The metering pattern sits under the focus points and , if it can select the size of the subject it meters off like TTL-BL , should give reasonably consistent results compared to TTL flash .
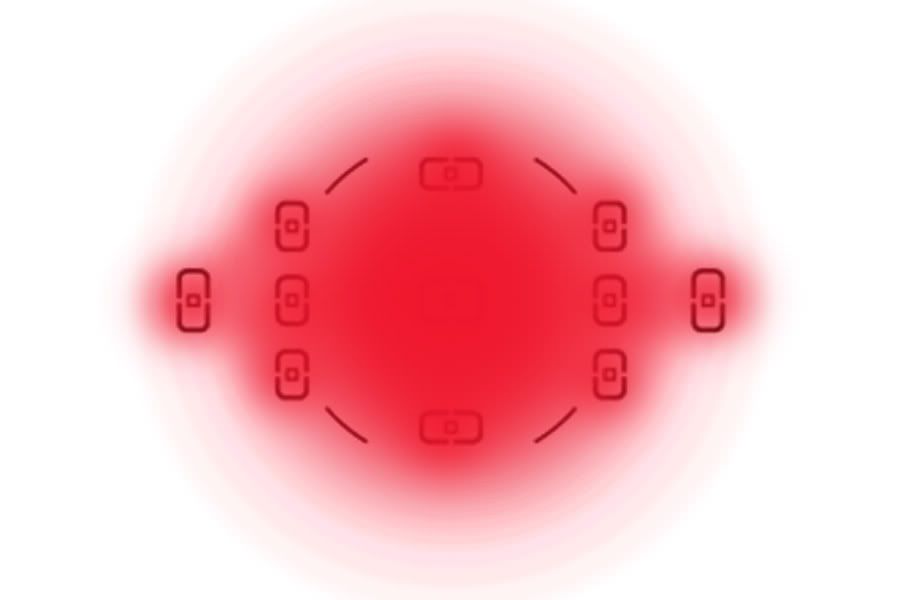 Another way of doing this test is with a black circle on a white background ... my D40 has 3 focus points .


As you can see the focus point diamond plays a very important role in how TTL-Bl meters .... how does canon flash compare ?
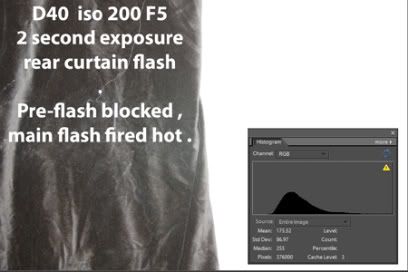
Test 4.) A basic test that should give the same results in TTL and ETTLii mode .
Take a picture indoors where it is dark . iso 100 , F16 and 2 seconds [ the ambient must still be underexposed ] , use rear-curtain flash . Put your hand in front of the flash and take the picture - as you press the shutter the pre-flash will fire on your hand ..... move your hand away before the main flash fires - just before the shutter closes .... it should fire brighter than normal since it couldn't detect the pre-flash reading .
Something like this ......

Test 5.) This is where it gets a little more complicated .
Set up your camera in manual on a tripod [ as you should have been doing ] . Take a picture of a subject with the ambient under-exposed by 4 stops using TTL mode and then in ETTLii mode .
they should look similar .
Then with the camera in manual mode still find the point where the meter shows correct exposure .
Take another picture in TTL mode and ETTLii mode . Most likely the picture in TTL mode will be much brighter than ETTLii which should register the fact that you have the ambient correctly exposed and compensate by backing off the flash .


Test 6.) [Similar to test 5 ] Slightly more complicated .
Find a situation where CW metering and pattern metering give different readings - look at the following images ....
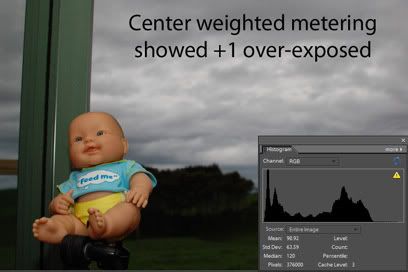
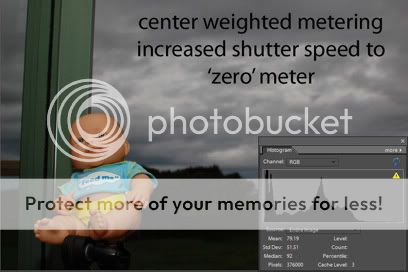

What we are trying to do in this test is establish how ETTLii decides how well you have the ambient metered . With TTL-BL the evidence suggests that TTL-BL is 'watching the meter ' and as soon as the meter moves to show underexposure the flash output increases to compensate - even if the the settings haven't changed !
I was told that TTL-BL measures the 'RAW data' to determine what the lighting is like .... obviously this can't be the way it does it because regardless of what the light looks like the final exposure depends on the settings you have chosen and how you decide to expose the image .
So : Find a setting similar to my example where CW and Pattern metering give different readings . Set the camera so you are correctly exposed for the one mode and when you change to the other mode you get under-exposure [ according to the meter ] . Take a picture with ETTLii at 'correct' exposure and then simply switch to the other exposure mode , that tells you it is now underexposed , and without changing any other settings take another picture with ETTLii and see if the output has changed .
These images were submitted recently - both taken with a lens that does not provide distance information ....
The histograms are almost identical showing that the flash output was the same even though the focus distance changed - obviously ETTLii couldn't use distance info in the equation .


There was a difference in the images when manual focus was used and the camera did not confirm a focus-lock .... it then appears to simply expose for average gray on the brightest object in the scene .


So far Stefan on photocamel has provided me with these images from the 7D and a 430 EX flash and the results are interesting .
Test 1.)


The histograms of both the 'near' focus and 'far' focus both went down instead of the 'far' focus increasing exposure as with TTL-BL mode . I was expecting the distance info from the lens to tell the flash system to increase output when the focus was changed to infinity but the opposite happened ?
Perhaps when the camera doesn't detect anything in focus it reverts to plain "average gray" metering for the flash ?
Now we are in the really early stages of doing these tests and nothing has been double checked by others yet so I still welcome input . I would like to go through all the tests as shown in my TTL-BL blog to see what we can work out and compare Canon and Nikon flash systems just for interest and for those who would like to learn the 'nuts and bolts' of the systems .
This is how Nikon's TTL-BL handled the situation .
When the flash system detected that focus distance was at its maximum it increased exposure without showing too much regard for the out of focus white in the foreground .
Compared to what Canon ETTLii does for the moment I see this as an advantage .
There are probably very few people who use manual focus indoors but for anyone who does manually select a focus distance the Canon flash system will instantly lose any advantage distance information from the lens would have given it if the camera doesn't agree that anything is in focus .
However with the run of problems with canon auto-focus who know what the camera may deem to be 'in-focus' ;) .
So the question now is " Does Canon ETTLii totally drop the distance information when it doesn't detect 'focus confirmation ?"
Anyone interested in doing the tests , this is the scenario we need :
Test 2.)
Please excuse the creepy looking baby but "Stinky" was my model back then .
Have a white object close to the camera and covering half the frame . Place the subject next to the reflector , take a picture , and then quite a distance behind it and take some pictures .
Nikon's TTL-BL ignored the white object and concentrated on what was in focus at the right distance .
Then set focus on infinity and take another picture .
This will tell us if ETTLii uses the lens distance info when the subject is in focus and whether it totally drops it if it does not confirm focus on a distance object .
I'll list the tests I would like samples of for those interested in participating , we'll call this test number 3.)
A comparison between TTL and ETTLii with a black and white subject and varying degrees of 'centrality' of the subject .... like this ....
The point of this test is to show how TTL meters differently to ETTLii . Normal TTL meters off a central circle while ETTLii should meter almost equally for the white subject as long as part of it is under the focus points . if the white leaves the focus point 'diamond' then it will probably blow out .
The metering pattern sits under the focus points and , if it can select the size of the subject it meters off like TTL-BL , should give reasonably consistent results compared to TTL flash .
As you can see the focus point diamond plays a very important role in how TTL-Bl meters .... how does canon flash compare ?
Test 4.) A basic test that should give the same results in TTL and ETTLii mode .
Take a picture indoors where it is dark . iso 100 , F16 and 2 seconds [ the ambient must still be underexposed ] , use rear-curtain flash . Put your hand in front of the flash and take the picture - as you press the shutter the pre-flash will fire on your hand ..... move your hand away before the main flash fires - just before the shutter closes .... it should fire brighter than normal since it couldn't detect the pre-flash reading .
Something like this ......
Test 5.) This is where it gets a little more complicated .
Set up your camera in manual on a tripod [ as you should have been doing ] . Take a picture of a subject with the ambient under-exposed by 4 stops using TTL mode and then in ETTLii mode .
they should look similar .
Then with the camera in manual mode still find the point where the meter shows correct exposure .
Take another picture in TTL mode and ETTLii mode . Most likely the picture in TTL mode will be much brighter than ETTLii which should register the fact that you have the ambient correctly exposed and compensate by backing off the flash .
Test 6.) [Similar to test 5 ] Slightly more complicated .
Find a situation where CW metering and pattern metering give different readings - look at the following images ....
What we are trying to do in this test is establish how ETTLii decides how well you have the ambient metered . With TTL-BL the evidence suggests that TTL-BL is 'watching the meter ' and as soon as the meter moves to show underexposure the flash output increases to compensate - even if the the settings haven't changed !
I was told that TTL-BL measures the 'RAW data' to determine what the lighting is like .... obviously this can't be the way it does it because regardless of what the light looks like the final exposure depends on the settings you have chosen and how you decide to expose the image .
So : Find a setting similar to my example where CW and Pattern metering give different readings . Set the camera so you are correctly exposed for the one mode and when you change to the other mode you get under-exposure [ according to the meter ] . Take a picture with ETTLii at 'correct' exposure and then simply switch to the other exposure mode , that tells you it is now underexposed , and without changing any other settings take another picture with ETTLii and see if the output has changed .
These images were submitted recently - both taken with a lens that does not provide distance information ....
The histograms are almost identical showing that the flash output was the same even though the focus distance changed - obviously ETTLii couldn't use distance info in the equation .


There was a difference in the images when manual focus was used and the camera did not confirm a focus-lock .... it then appears to simply expose for average gray on the brightest object in the scene .


Subscribe to:
Posts (Atom)

