Firstly , for those who love to sound rebellious by saying "Rules are made to be broken !" [ Try that on one of your male friends with the feminine head tilt ! ] , there is a big difference between
1.) totally ignoring rules and
2.)first finding out what they are and why the work in general and then breaking them for a reason to achieve a particular effect in an image .
I just thought I'd add that after some of the responses to this article .
This tutorial was kindly provided by "Benji" of www.photocamel.com of "sonshinestudios" contact him via his website if interested in his DVD .

 I have garnered these rules over the last 25 years as a professional photographer. Some of them have been modified somewhat by the general relaxation of posing people in the last ten to fifteen years or so.
Why rules in portraiture? Most people would not spend $100.00 for an 8 x 10 snapshot that they could have done themselves with a point and shoot camera in their own backyard. They will however spend $100.00 (or more) for an 8 x 10 if it is a beautiful portrait of their loved one, one in which they look good, and if you follow the rules you should get beautiful portraits. Once you learn them you can then judiciously bend or break them a little to achieve that "perfect" image that you see in your mind.
These rules are for PORTRAIT images. Just as there is a difference between a mini van and a sports car, even though both are motor vehicles, both run on gasoline and both will get you to your destination in comfort, there is also a difference between portraiture and fashion images. In portraiture it is all about the face. In fact the word "portrait" literally means "A pictorial likeness or photograph of a face." In fashion photography it is all about the clothing.
While some rules will be applicable to both fashion images and portraiture some will not.
Rule # 1.* No Sleeveless Clothing in The Head and Shoulders Portrait.* I took the image on the left, cloned her blouse several times in order to cover her right upper arm.* Note the difference as to where your eye is drawn when you view the image. In a portrait the first thing you should see is the face.

Rule # 2. "No shorts in group portraiture."* This happened to me twice this year (for the first time in years!)* Even though we specifically state in our clothing consultation NO SHORTS we still get people who show up in shorts.* When this family called, they said they wanted to be photographed in blue jeans and asked if that is OK.* I said yes and told mom to make sure the shirts/blouses are all the same color.* I of course was expecting long blue jeans NOT shorts.* The image below is one of the poses.* Note how dad's and his youngest daughter's bare legs really attract attention.* That is because our eyes are attracted to bare skin, and that is why the ONLY bare skin that should show in PORTRAITURE is the face. Remember, the FACE is what portraiture is all about.

Next four rules, (since I have two images that show four problems!)
3. Avoid Bright Colors and Bold Patterns in Clothing. The idea of a portrait is to see the face of the subject. Brightly colored clothing and bold patterns draw the eye away from the subject's face. (This is especially true in the head and shoulders portrait.)
4. Avoid Football Shoulders-The body should not be turned straight to the camera.
5. Solid Pyramidal Base - The body should not be turned 90 degrees away from the camera. 45 degrees is usually the ideal angle for the head and shoulders portrait. Posing someone at a 90 degree angle to the camera does not allow the head to appear to have proper support. After posing the subject at a 45 degree angle, bring the arms out to form the sides of the pyramid.
The above rules are true whether you are shooting a head and shoulders image or a full length family portrait. My examples will be of the head and shoulders image. I borrowed* these images from my video "Photographing The High School Senior Girl in the New Millenium."* Also note I broke the "no sleeveless clothing" rule.* Remember, the main thing in portraiture is to keep the main thing (the face of the subject) the main thing.
Lastly, Sit Tall- (Rule 7) Do not allow your subject to slump over or get round shouldered. Note how May has slumped over in both of these images making her look short and dumpy.
Rule # 6, Correct Posing Stool Height- I have found that a 24 inch tall stepladder works wonderfully as a posing stool for nearly all of my traditional head shots, provided my subject is not very overweight. For the overweight subject use a taller stool to allow their paunch to drop. I added a wider top rung (the seat) to the wooden ladder because most people's buns are wider than 4 inches!
In the image I posted below, you can see my modified stepladder.* It also shows how raising the leg closest to the camera will tilt the torso (and the shoulders) slightly away from the camera, which happens to be Rule 9.* This rule applies to females only.*
9. (Females) Lean Slightly Away From The Camera.* I also place a small wooden wedge under the buttock closest to the camera. This will keep the shoulder that is closest to the camera higher than the other one, but will still allow the subject to relax. I added "sides" to my widened top rung with slots on both sides for the wedge to fit into.

Next rule,
Rule 8. Lean Forward Slightly-"Over the belt buckle." This eliminates the static straight up and down look and will give a feeling of movement and motion to the portrait. In the left image below she is seated bolt upright. In the right hand image she is leaning over the belt buckle to camera left and also slightly to the left rear. I then had her turn her head back toward the main light at camera right.
Rule 8. Lean Forward Slightly-"Over the belt buckle." This eliminates the static straight up and down look and will give a feeling of movement and motion to the portrait. In the left image below she is seated bolt upright. In the right hand image she is leaning over the belt buckle to camera left and also slightly to the left rear. I then had her turn her head back toward the main light at camera right.

Rule 10. Project The Chin - Especially if your subject has a full or double chin. By projecting the chin out toward the camera and using a slightly higher camera position the double chin can be nearly eliminated. Photoshop can finish the rest!
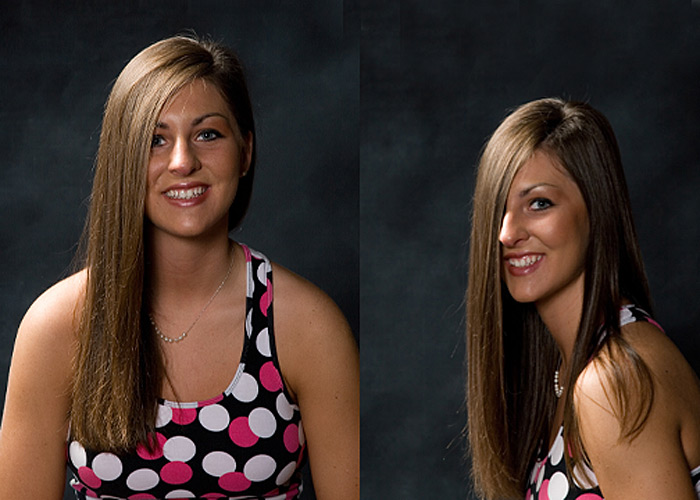
11. Proper Head Tilt- Never tip a man’s head to the high (feminine) shoulder as he will look feminine. Women's heads can be tipped toward either shoulder, but the feminine shoulder is more appealing.
11. Proper Head Tilt- Never tip a man’s head to the high (feminine) shoulder as he will look feminine. Women's heads can be tipped toward either shoulder, but the feminine shoulder is more appealing.

Female head tilt. Note that the female looks good in either the masculine head tilt, or the feminine head tilt. In some poses the masculine head tilt works better for the female, especially if the background or the set she is posed in is a more masculine background or set.

Rule # 12. Proper Eye Direction-Generally speaking, in males the eyes should follow the direction of the nose.* For females there should be slightly more whites of the eyes on one side than on the other.*
Rule 12a. The eyes should never be turned so far in their sockets that there is no white area on one side, and you should not shoot into the whites of the eyes.* A slightly higher camera angle will give more whites at the bottom than at the top which is more appealing in images of young females.*
12b. The catchlights from the main light are considered correctly placed when they appear at the eleven o'clock or one o'clock position in both eyes. One catchlight is normally preferred because there is only one sun but two or more is acceptable. One catchlight per eye suggests thoughtfulness; more than one creates a look a merriment. In multiple catchlight images the catchlight from the main light should be the brightest.
In the image below the subject is staring up into space. Some wise sage once said; "The eyes are the windows to the soul."* This is not to say that every image must have the subject looking directly at the lens, but it seems most people like images that the subject is looking at the camera (them) and sales data will bear this out to be true.*

Rule 13. Proper Camera Height - Generally speaking, the camera lens should be at about eye level for head and shoulders portraits, chin level to chest level for ¾ length and chest level to waist level for full length portraits. An even lower camera height for heavy set brides, that are posed standing, will make her appear taller and more "regal."
This rule is perhaps the one I break most often. Just as I will not tilt the head of a 60 year old female as much as I will of a 16 year old female, I also don't usually stand on a step ladder or stool to photograph a 60 year old woman, but I do for a girls high school senior portrait. A higher camera position in head and shoulders portraits of high school seniors will give their eyes a more "glamorous" look. If the 60 year old woman wants to look glamorous, I will of course use a high camera position (or if she has a double chin) it all depends of the final use of the image.
In the image below, I broke rule 13. I was on a step ladder about nine feet above the subject in the second image and at ground level for the first image. Note how much thinner she appears in the second image. This works best for subjects seated on the floor. Note how the background "moved up" when I raised the camera position up. You may want to pre-position the background somewhat lower to compensate for this.

Rule 14. Use The 1-2-2 or The 1-3-2 Posing Technique.


Males usually look best in the 1-2-2. Females usually look best in the 1-3-2 technique. The images below shows both.
This technique is used mostly on younger females and will add that "extra touch" to your images to raise them above what the other guy is doing.* A brief description is in order however.
"The 1-3-2 posing technique is where the body is turned 45 degrees away from the camera and also away from the main light source (position # 1) then the face is turned back beyond the camera position additional 20 degrees or so (position # 3) then the eyes are brought back to the camera position (position # 2.)* The main light is always cross lighting the female form in this technique and will draw a pleasing short light pattern on the face."* This is rather wordy so I will attach several images to show the technique.* This technique can be used for head shots, waist up, 3/4 length or full length poses when seated or when standing and is usually used only on young females.
Benji
P.S. I demonstrate in detail this technique in my video. PM me for further information.

Another, this time a 3/4 length and outdoors.

Another, seated this time.

Males usually look best in the 1-2-2. Females usually look best in the 1-3-2 technique. The images below shows both.

Rule 15. Avoid Flat Lighting. *Portraits usually look best with one side brighter than the other side. *When the shadow side of the face is closest to the lens it is called short lighting. *Short lighting will make the face appear narrower and more slender. *If the shadow is on the side opposite of the lens it is called broad lighting. *Broad lighting will make the face appear wider and heavier. * Flat lighting is where there are no shadows on the face at all. *On camera flash will give you flat lighting. *In the image below, the flat lit image was lit with my home made ring light, the other with a 24 x 32 inch softbox with louvers at camera right.
The main light should enter the same side of the female's face that the part in her hair is on. This will allow the main light to "get under" her hair and brighten up the eye that is on the shadow side (preventing "trapped eye.") Lighting the face this way will also prevent shadows running under her hair along the cheek line.
The main light should enter the same side of the female's face that the part in her hair is on. This will allow the main light to "get under" her hair and brighten up the eye that is on the shadow side (preventing "trapped eye.") Lighting the face this way will also prevent shadows running under her hair along the cheek line.

Rule 16. Watch the Nose and Cheek Line-The face should not be turned so far away from the camera that the nose will break or nearly break the far cheek line. This will make the nose look large. 16 a. The far eye should either been seen completely or not be seen at all, but one should never photograph the face so that only 1/2 of the far eye shows. Note that this pose will also cause the subject's eyes to have too much white on one side of the eye as opposed to the other side of the eye (a violation of rule 12.)

Rule 17. Avoid Clutter - Simplicity is usually best. *For example too many props in one image. A background that is too busy, or in sharp focus. Another one is a brightly lit background, or a background with large areas of bright sunshine or patches of white sky. These things will attract the eye to them rather than to the subject.
17 a. Busy clothing will create confusion for the eye. *The eye should immediately be drawn and rest upon the subject. *Using a telephoto lens with a large aperture will give you short depth of field which will blur the background.
In the left image below, the pattern of the blouse is too busy and the background is too sharp. These two problems have been corrected in the image on the right. A simple blouse change and moving her forward about 12 feet (and stepping back with the camera 12 feet) allowed the background to be softened.* The background could also be blurred in Photoshop if your DOF is more than what you anticipated, but I like to get it right to begin with and leave Photoshop for enhancing. Note in both images the back arm is completely and totally visible. I feel it looks best to have the entire arm visible rather than the upper arm/shoulder area visible then the elbow/middle arm not visible and then the hand suddenly reappearing at the wrist.

Rule 18. Crop Between The Joints, Not At them. Cropping at a joint makes the subject appear amputated. Also when cropping leave room for the subject to breathe (room in front of their face) and leave room for the subject to think (don't severely crop off the top of their head.) Generally if you crop off the top of the head you cannot also crop off very much in front of their face at the same time. If you do they will look crowded in the frame.

Rule 19. Watch Recessed Cheek Line with Glasses. I usually have the subject obtain empty eyeglass frames which will solve the problem immediately. Another suggestion is to shoot at least one image without the glasses which will give you a good set of eyes. You can then in Photoshop add them to the image that the subject has chosen to purchase. This technique will also take care of the distortion caused by eyeglass lens refraction which makes the subjects eyes look larger or smaller than what they really are.

Rule 20. Don’t Overuse Hair and Kicker Lights-The hair light should kiss the hair, not blast it. Same for the kicker lights.

Rule 21. If It Bends, Bend It-This rule is perhaps the single most important rule. 21 a. Wherever there is a joint, “break” it. Combining these rules along with Rule 8 (Lean the body over the belt buckle, Rule 9 Lean slightly away from the camera Rule 31 If the subject has two of them make them different and lastly Rule 32 (A general rule) Avoid 90 Degree Arms will create a very dynamic image devoid of any staticness. These rules are basically true whether the pose is a head and shoulders pose or a full length seated pose.
Note in the posted image nothing is straight (other than her wrists) or straight up and down. She is at a 45 degree angle to the camera, leaning back, her hips are canted, her shoulders are slightly tipped, her head is tilted, her back leg is bent, both elbows are bent, all of her fingers are curled and even her eyes are not straight in their sockets (Rule 12.) All of this bending, leaning, tilting, twisting and turning also helps in following Rule 31, If The Subject Has Two of Them, Make Them Different. Note her hands are not at the same height nor are they across from one another, her elbows are at different heights, her knees (even though you can't see them) are at two different heights.
Note in the posted image nothing is straight (other than her wrists) or straight up and down. She is at a 45 degree angle to the camera, leaning back, her hips are canted, her shoulders are slightly tipped, her head is tilted, her back leg is bent, both elbows are bent, all of her fingers are curled and even her eyes are not straight in their sockets (Rule 12.) All of this bending, leaning, tilting, twisting and turning also helps in following Rule 31, If The Subject Has Two of Them, Make Them Different. Note her hands are not at the same height nor are they across from one another, her elbows are at different heights, her knees (even though you can't see them) are at two different heights.

Rule 22. Don’t Stack The Hands or Clasp Them Together-Seperate them and place them apart and between the joints. Hide the rear hand if possible in group portraits. I've posted three images showing how this rule was broken three different ways. 22a. Don't place an elbow directly on top of the knee. Place the lower arm area that is 1/2 way between the elbow and wrist 1/2 way between the hip and knee. That way the elbow does not end at the knee forming an uninteresting straight line.

Rule 23. Subdue the Near hand-The hand that is nearest to the lens will appear larger than the other hand especially if it is held very close to the lens (foreshortening.) Feet or legs pointed toward the camera will also look elongated due to foreshortening.
23 a. Don't project the hands toward the lens and keep them within the range of focus. 23 b. Generally speaking, if the hand is above the subject's waist, the fingers should be directed upwards.* If below the waist, the fingers should be directed down.* *The little finger side of the hand photograph's best.* I will post an image that does NOT break this rule.
23 a. Don't project the hands toward the lens and keep them within the range of focus. 23 b. Generally speaking, if the hand is above the subject's waist, the fingers should be directed upwards.* If below the waist, the fingers should be directed down.* *The little finger side of the hand photograph's best.* I will post an image that does NOT break this rule.

Rule 24. Don’t Photograph The Back of Women's Hands.* The sides are much more graceful than the flat of the hand. 24a. Fists are masculine, open hands are feminine.* Note how much more graceful the edges of the hands of the young lady in the second image looks when compared to the flat back of the hand in the first image. I will post an additional image (a horizontal) in my next posting also showing posing the sides of the hands.

Another pose showing rule 24 and how I posed the hands so the sides of the hands show rather than the flat back.

Rule 25. Place the Weight on the Back Foot- and shift the hips (with standing poses.) This will put the hips and shoulders at a pleasing angle. Ask the subject to point her foot that is nearest to the camera toward the camera and shift her weight to the back hip. *This means the front leg and foot will have no weight on it. *She should then bend her knee slightly toward the other leg. *This will give a pleasing “S” curve to her body.
As you may have already noticed, some rules are for women only, some for men only, some for couples and groups only. Then there are rules for seated poses only, standing poses only and some work best on younger subjects as opposed to more mature subjects.*
Rule 26. (Couples Portraiture) Do Not Photograph Two Heads at the Same Height- Ideally the eyes of the shorter subject (usually the female) should be at about the same height as the mouth of the taller subject.
Rule 26. (Couples Portraiture) Do Not Photograph Two Heads at the Same Height- Ideally the eyes of the shorter subject (usually the female) should be at about the same height as the mouth of the taller subject.

Rule 27. (Couples or Group Portraiture) Have No Head Directly Above Another-All heads should not only be at different heights but also not directly above (or below) another subject. The eyes of the subject that is lowest in the group should be at about the same level as the chin of the next highest subject. For example in the image below note the eyes of the young lady at camera right are at the same level as the chin of her older sister at camera left. You may have to have someone take off their shoes or stand on something to get this effect. Lots of photographers use old hard bound books with the covers taped together with gaffers tape for this very purpose. On book will raise someone up about 1 inch, 2 books will raise him or her 2 inches!

Rule 28. Avoid Crotch Shots-Raising the leg that is closest to the camera in a standing pose will prevent shooting into the subject’s crotch. *In groups, turning the subject's body to a 45 degree angle and keeping the legs together should prevent shooting into the crotch. *This rule has been "relaxed" in the last decade or so for high school senior images, especially for boys and to a somewhat lesser extent for gals.

Rule 29. Use The Right Key and Good Taste-Generally speaking a subject dressed in all white looks best in a medium or high key background. Conversely, a subject dressed in dark clothing looks best on a medium or dark (low key) background. Note in the above image (the gal in rule number twenty eight above) I broke this rule because she is dressed in black with a black prop but on a white background. Again this rule is frequently broken especially in high school senior portraiture.
Rule 30. If The Subject Has Two of Them, Make Them Different.* Feet, knees, arms, hands and elbows at different levels are more interesting than when placed side by side.* Note in the posted image that everything that can be made different has been made different. His hips are not level, his shoulders are not level, his head is tipped to the masculine shoulder, he is leaning slightly, his knees, feet, arms, hands and elbows are not side by side but are placed at different and multiple levels. Sameness leads to boringness in a photographic image.
After you "rough in" the pose you will most likely want to refine certain things. When refining a pose, do the least important areas first then as you progress toward the actual capture make the final refinements on the most important areas last.
After you "rough in" the pose you will most likely want to refine certain things. When refining a pose, do the least important areas first then as you progress toward the actual capture make the final refinements on the most important areas last.

Rule 31. Avoid "90 Degree" Arms (a general rule for females.) Don Blair called these arms "Carpenter's T square arms."
Gently flowing lines usually look best in portraits of women. I broke this rule in my example image of rule 25 above. In my bridal example below I followed it.
Gently flowing lines usually look best in portraits of women. I broke this rule in my example image of rule 25 above. In my bridal example below I followed it.

Rule 32. Don't Shoot Into a Bare Armpit. Either cover it with something or raise the opposite arm and bring the near arm down. *I've seen bare armpits covered with the young lady's long hair, flowers, toul, strips of cloth, and small props. With long sleeved clothing shooting into an armpit is usually not a problem. *In the example image I covered one with her long hair, and I heavily retouched the other. She didn't buy this image.

Rule 33. (Group Portraiture) Have the subjects at either end of the image face in toward the center. *This will keep the viewer's attention on the subjects. *I also use this technique when placing the preview images in my high school senior folios. *The images on the left side of the folio all face to the right and those on the right face left. *The master painters of the Rennaissance used this technique to keep the viewers attention within the painting.

Rule 34. Use A Telephoto Lens - Short telephoto lenses will prevent foreshortening (covered in rule # 23) which is where objects nearest the lens will appear larger than objects farther away.* Use of a short telephoto lens in group portraiture will make all the faces approximately the same size regardless of whether they are in the front row or the rear row. I used a short telephoto lens in virtually every one of the images in this tutorial.
Rule 35. Avoid Posing A Bride Kneeling on the Floor.* The wedding gown is designed to look correct and usually flows beautifully and therefore photographs best when the bride is standing.* A bride seated on a posing stool for a head and shoulders image or for a waist up or 3/4 length shot is of course perfectly acceptable.
Rule 36. Hand Placement. Use good taste in the placement of hands. The hand(s) of the client should not disappear between his or her legs and the hand(s) of a young lady should not be placed on top of either of her breasts, nor should a young man's hands be on the buttocks or breasts of the female client. When photographing hands watch that the middle finger doesn't protrude out further than the rest of the fingers.
Benji
As mentioned earlier, these "rules" are really guidelines. Once you know them you can judiciously break them.
Ok , since posting this john Domeney gave this suggestion ..... we'll call it.....
Rule 37.
Another rule I try to use is identify the clients larger eye, there is almost always a slight difference in size, and put it further away, so both eyes appear to be similar size.
You can imagine the effect if you put it the other way around.
Also see "Portraiture tips" by Steve Webb .
.


Interesting if old fashioned system. My biggest disagreement is with your statement about camera angle. I have found, in thousands of portrait shoots, that the angle should be determined by observing the face as you raise and lower the camera on the tripod, and that this may be more important than most other variables. I admit I skipped a few rules when reading your statement. Was "the camera must be on a tripod or camera stand" one of them. It should be.
ReplyDeleteThanks for the input - I personally know little about the subject and so just copied an article from a forum - with permission of course :)
ReplyDeleteAll opinions are welcome as I learn from them as well !